Configuring two-way SSL using Estonian ID-cards in the Ubuntu Nginx web server
Version: 26.08/1
Published by: RIA
Version information
| Date | Version | Changes/Notes |
|---|---|---|
| 08/02/2019 | 19.02/1 | Public version. |
| 28/02/2019 | 19.02/2 | Added notes about the user certificate validity check. Default webpage removal. — Changed by: Urmas Vanem |
| 12/12/2019 | 19.12/1 | Added recommendations for securing Nginx. — Changed by: Urmas Vanem |
| 30/12/2020 | 20.12/1 | Ubuntu updated to 20.04.1. Nginx updated to 1.19.6. Configuration management changed (sites… -> conf.d). Added OCSP-based revocation lists, recommended security settings, and filtering of wrong CA certificates. — Changed by: Urmas Vanem |
| 13/01/2021 | 21.01/1 | Added the demonstrative configuration file. Added HSTS configuration. — Changed by: Urmas Vanem |
| 25/01/2021 | 21.01/2 | Changed the HSTS recommendations. Changed the SSL/TLS and cipher recommendations. Added additional security recommendations. — Changed by: Urmas Vanem |
| 28/04/2021 | 21.04/1 | Support for outdated ESTEID-SK 2011 certificates removed. — Changed by: Urmas Vanem |
| 25/11/2021 | 21.11/1 | Ubuntu updated to Server 21.10. Nginx updated to 1.21.4. Added guidance for ECC certificates. Updated TLS and cipher recommendations. — Changed by: Urmas Vanem |
| 22/02/2023 | 23.02/1 | Ubuntu updated to Server 22.04 and Nginx to 1.23.3. Virtual host configuration updated. — Changed by: Urmas Vanem |
| 18/12/2023 | 23.12/1 | Removed the ESTEID-SK 2015 chain. — Changed by: Urmas Vanem |
| 22/08/2024 | 24.08/1 | Ubuntu updated to Server 24.04 and Nginx to 1.27.1. — Changed by: Urmas Vanem |
| 31/10/2025 | 25.10/1 | Added Zetes chain, removed SK OCSP section. — Changed by: Lauris Kaplinski |
| 22/04/2026 | 26.04/1 | Converted to Markdown format. — Changed by: Raul Metsma |
| 21/08/2026 | 26.08/1 | Updated certificate-key, TLS protocol, cipher-suite, certificate-policy, and OCSP guidance based on the 2026 cryptographic algorithms life-cycle report. — Changed by: Raul Metsma |
- Configuring two-way SSL using Estonian ID-cards in the Ubuntu Nginx web server
Intro
This guide describes:
- How to install and configure the Nginx 1.28.1 web server on Ubuntu Server 24.04.
- How to configure HTTPS (one-way SSL) in the web server.
- How to configure ID-card authentication (two-way SSL) using SK ID Solutions (
EE-GovCA2018) and Zetes (EEGovCA2025) ID-cards. - How to check client-certificate revocation and configure server-certificate OCSP stapling.
- How to protect the web server.
This guide also covers other configuration options such as how to configure HTTP -> HTTPS redirection, etc.
Nginx installation and configuration
Installation
By default, Ubuntu 24.04 installs Nginx version 1.24. However, since version 1.28.1 is used in this guide, additional changes are required before installation.
To install Nginx 1.28.1 on Ubuntu 24.04:
-
Run in terminal
$ sudo add-apt-repository ppa:ondrej/nginx PPA publishes dbgsym, you may need to include 'main/debug' component Repository: 'Types: deb URIs: https://ppa.launchpadcontent.net/ondrej/nginx/ubuntu/ Suites: noble Components: main ' Description: This branch follows latest NGINX Stable packages compiled against latest OpenSSL for HTTP/2 and TLS 1.3 support. BUGS&FEATURES: This PPA now has a issue tracker: https://deb.sury.org/#bug-reporting -
Run in terminal:
$ apt update Hit:1 http://ee.archive.ubuntu.com/ubuntu noble InRelease Hit:2 http://ee.archive.ubuntu.com/ubuntu noble-updates InRelease Hit:3 http://ee.archive.ubuntu.com/ubuntu noble-backports InRelease Hit:4 http://security.ubuntu.com/ubuntu noble-security InRelease Hit:5 https://ppa.launchpadcontent.net/ondrej/apache2/ubuntu noble InRelease Hit:6 https://ppa.launchpadcontent.net/ondrej/nginx-mainline/ubuntu noble InRelease -
Run in terminal:
$ apt install nginx-full
Reading package lists... Done
Building dependency tree... Done
Reading state information... Done
The following additional packages will be installed:
  libnginx-mod-http-auth-pam libnginx-mod-http-dav-ext libnginx-mod-http-echo
  libnginx-mod-http-geoip2 libnginx-mod-http-subs-filter
  libnginx-mod-http-upstream-fair libnginx-mod-stream
  libnginx-mod-stream-geoip2 nginx nginx-common
The Nginx version can be checked with the command
$ nginx -v
nginx version: nginx/1.28.1
Configuration
Enabling one-way SSL
Creating the private key and the Certificate Signing Request (CSR)
Elliptic Curve Cryptography (ECC)
First, generate an ECC private key, then an ECC CSR1:
$ openssl ecparam -name secp384r1 -genkey -noout -out Nginx2404.key
$ openssl req -new -key Nginx2404.key -out Nginx2404.csr -subj /C=EE/O=OctoX/CN=Nginx2404.octox.demo -reqexts SAN -config <(cat /etc/ssl/openssl.cnf <(printf "[SAN]\nsubjectAltName=DNS:Nginx2404.octox.demo,DNS:MYWEBSERVER.octox.demo"))
Nginx2404.keyis the private key of the certificate;Nginx2404.csris the CSR for the certificate authority (CA);CN=Nginx2404.octox.demois the common name for the certificate;DNS:Nginx2404.octox.demoandDNS:MYWEBSERVER.octox.demoare SAN DNS names for the certificate. These names must correspond to the actual address of the website2. The names must also be resolvable in name services.
Generate a separate private key for every independent TLS server. Do not copy one key between servers merely because a wildcard or multi-SAN certificate could cover all their names. Keeping keys separate limits the impact of a server or key compromise.
For production deployments, use a hardware security module (HSM) or an equivalent non-exportable hardware-backed key store where supported. Generate the key inside the device and keep it non-exportable. Confirm that the HSM, OpenSSL integration, and certificate issuer support the selected ECDSA P-384 key before deployment. The file-based key in this example is not an HSM setup.
The contents of the CSR can be viewed by running
$ openssl req -in Nginx2404.csr -noout -text
Certificate Request:
    Data:
        Version: 1 (0x0)
        Subject: C = EE, O = OctoX, CN = Nginx2404.octox.demo
        Subject Public Key Info:
            Public Key Algorithm: id-ecPublicKey
                Public-Key: (384 bit)
                pub:
                    04:83:8a:77:21:33:00:ac:6a:66:28:f4:7e:8e:98:
                    fa:52:09:ed:bb:83:f9:98:ee:24:3b:48:b1:e2:ad:
                    ae:1d:57:70:b1:9a:5c:c7:9c:4c:cb:95:f9:ff:b1:
                    89:4f:d0:c9:e1:39:0e:5d:ac:c6:d3:92:64:39:23:
                    5c:d0:fc:0e:38:17:22:3c:bb:e0:fb:ca:2c:8e:55:
                    65:2b:7c:56:6a:55:4a:b8:ae:a4:8c:e5:81:b7:a9:
                    d6:e4:5a:1a:aa:af:37
                ASN1 OID: secp384r1
                NIST CURVE: P-384
        Attributes:
            Requested Extensions:
                X509v3 Subject Alternative Name:
                    DNS:Nginx2404.octox.demo, DNS:MYWEBSERVER.octox.demo
        Signature Algorithm: ecdsa-with-SHA256
        Signature Value:
Ordering and installing an SSL certificate
The CSR Nginx2404.csr should be sent to trustworthy CA. In the demo environment, the certificate issuer is the test CA. Signed certificate is issued in PEM format.
-----BEGIN CERTIFICATE-----
MIICfjCCAZygAwIBAgITEQAAAAvIEFUdbDDF...
...
Hz3/vZjy73t2ag==
-----END CERTIFICATE-----
In Ubuntu, the certificate looks like this:
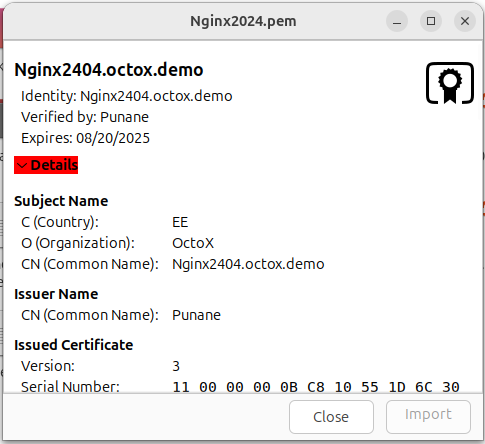
The certificate also includes the algorithm and alternative SAN DNS names of the subject:
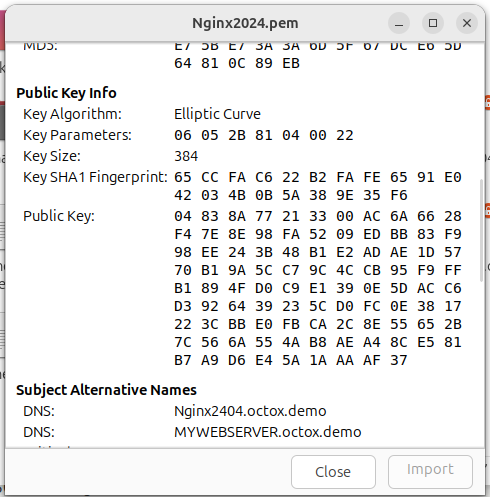
As you can see, certificate issuer is a CA named Punane. Now, you need to obtain the issuer CA’s certificate in PEM format and save it to the user’s home folder in Ubuntu as Punane.pem.
Consolidate all one-way SSL certificates into one file, with the web server certificate first. In this example that means Nginx2404.pem followed by its CA certificate Punane.pem. This can be done in a text editor (placing the Base64-encoded certificates one after another) or with the command
$ cat Nginx2404.pem Punane.pem >Nginx2404_Bundle.pem
When opened in Ubuntu, the file looks like this:
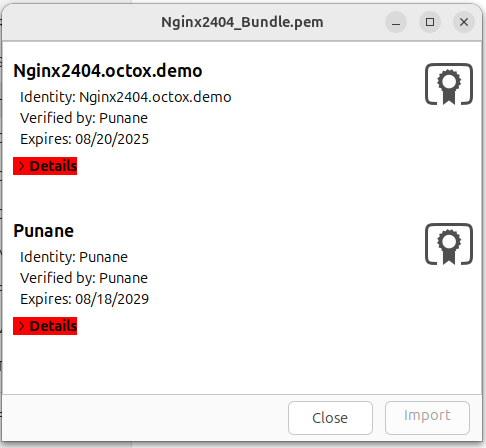
Place the bundled certificate file Nginx2404_Bundle.pem in the /etc/ssl/certs folder. In addition, you need to place the certificate private key in the /etc/ssl/private folder.
$ cp Nginx2404_Bundle.pem /etc/ssl/certs
$ cp Nginx2404.key /etc/ssl/private
Now, all the certificates and the private key needed by Nginx for one-way SSL have been correctly installed.
Creating a virtual website
Create a separate virtual website for your configuration. First, create a home folder named /var/www/Nginx2404 for the content of the website.
$ mkdir /var/www/Nginx2404
Put a simple and recognizable webpage named index.html into the folder you created.
Then, prepare the configuration file for the new virtual website. Create a new file named /etc/nginx/conf.d/Nginx2404.conf (e.g. with the command nano /etc/nginx/conf.d/Nginx2404.conf).
$ nano /etc/nginx/conf.d/Nginx2404.conf
Now, change the new configuration file as you wish. Paste the following configuration in it3:
server {
    listen 80;
    listen [::]:80;
    server_name Nginx2404.octox.demo;
    return 301 https://Nginx2404.octox.demo;
}

server {
    # SSL configuration
    listen 443 ssl;
    listen [::]:443 ssl;
    root /var/www/Nginx2404;
    index index.html;
    server_name Nginx2404.octox.demo;

    # Certificates
    ssl_certificate /etc/ssl/certs/Nginx2404_Bundle.pem;
    ssl_certificate_key /etc/ssl/private/Nginx2404.key;

    location / {
        try_files $uri $uri/ =404;
    }
}
You can verify the configuration syntax with nginx -t. If there are no errors, start nginx to activate the web service:
$ systemctl start nginx
If nginx is already running, you can apply the changes by restarting nginx with the terminal command
$ systemctl reload nginx
Result
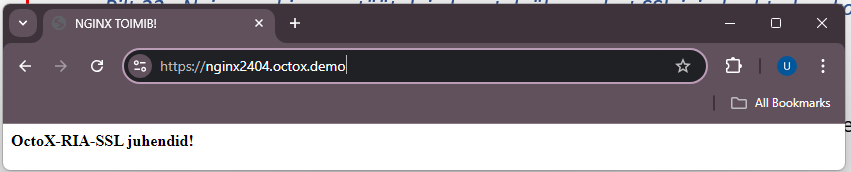
Now, the new website can be accessed by one-way SSL. In addition, all HTTP requests to the site http://Nginx2404.octox.demo are automatically redirected to the HTTPS site https://Nginx2404.octox.demo.
Requiring two-way SSL
If you wish to allow website access by authenticating with an Estonian ID-card, you need to supplement the existing configuration slightly.
Add the following lines after ssl_certificate_key in the SSL section of the file Nginx2404.conf:
# Certificates
ssl_certificate /etc/ssl/certs/Nginx2404_Bundle.pem;
ssl_certificate_key /etc/ssl/private/Nginx2404.key;
ssl_client_certificate /etc/ssl/certs/EID_Bundle.pem;
ssl_verify_client on;
ssl_verify_depth 2;
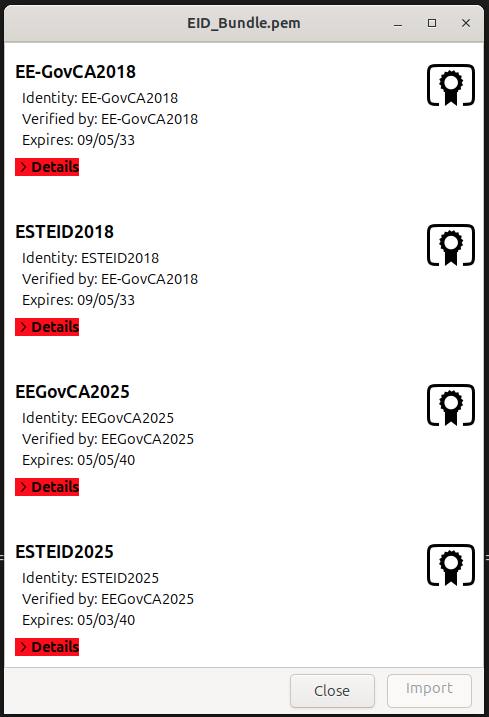
Now, create a new text file named EID_Bundle.pem, which includes the eID root and intermediate certificates (EE-GovCA2018, ESTEID2018, EEGovCA2025, ESTEID2025) in PEM format. With this file, you can filter out all CA’s whose certificates are supported by the new website. The user will only see the certificates from those chains. The ‘cat’ command can be used to create this file, but it also works as copy-and-paste between text redactors. When opened in Ubuntu, the file looks like this:
Save the file as EID_Bundle.pem and copy it to the folder /etc/ssl/certs. Restart the Nginx web server to activate the change:
$ systemctl reload nginx
After accessing the website Nginx2404.octox.demo now, a user certificate is required:
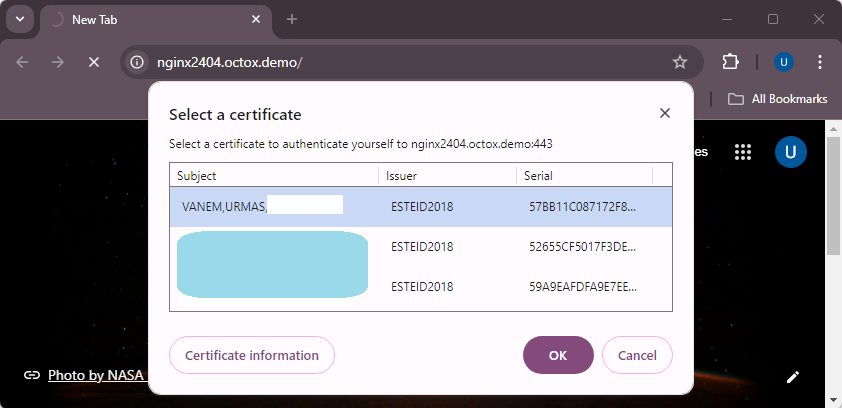
The server suggests certificates to the user, the issuers of which are described in the file EID_Bundle.pem. After confirming the certificate and entering the PIN, the user can access the website – two-way SSL works.
A complete demonstrative Nginx configuration file combining all settings in this document is available in the Appendix.
Additional configuration options
The purpose of this document is not to give exact guidance on how to optimize or protect websites, but to show how to configure two-way SSL for Estonian ID-cards. However, you should take into account the following.
Firewall rules (if necessary)
For creating a firewall rule, run the command on the terminal:
$ ufw allow 'DESIRABLE RULE'
For example, to allow HTTPS traffic only, run
$ ufw enable
Firewall is active and enabled on system startup
$ ufw allow 443/tcp
Rule added
Rule added (v6)
If the firewall is active (ufw enable), running the command ufw status in the terminal shows the active rules.
$ ufw status
Status: active

To                         Action      From
--                         ------      ----
443/tcp                    ALLOW       Anywhere
443/tcp (v6)               ALLOW       Anywhere (v6)
Checking client-certificate revocation with OCSP4
OCSP (Online Certificate Status Protocol) lets Nginx check the revocation status of a client certificate during authentication.
Certificates issued under the ESTEID2018 and ESTEID2025 CAs contain their AIA OCSP service address (http://aia.sk.ee/esteid2018 and http://ocsp.eidpki.ee).
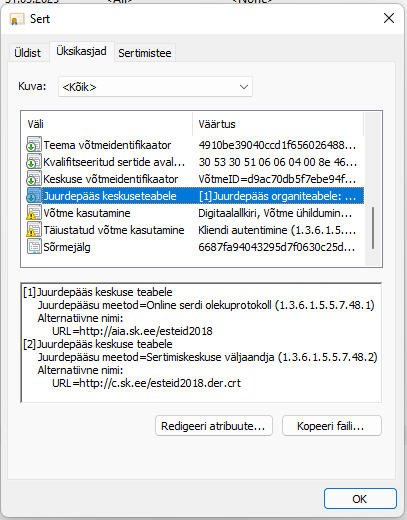
To enable the user certificate validity check against the AIA OCSP service, you need to add the following lines after ssl_verify_depth in the SSL configuration of Nginx:
# Certificates
ssl_certificate /etc/ssl/certs/Nginx2404_Bundle.pem;
ssl_certificate_key /etc/ssl/private/Nginx2404.key;
ssl_client_certificate /etc/ssl/certs/EID_Bundle.pem;
ssl_verify_client on;
ssl_verify_depth 2;
ssl_ocsp leaf;
ssl_ocsp_cache shared:OCSP:10m;
resolver 194.126.115.18;
The leaf value checks the end-user certificate, and the shared cache reduces repeated responder queries. The responder address is taken from the client certificate. Replace the resolver IP with a DNS server capable of resolving public addresses5. Allow outbound DNS and HTTP access to the responders and monitor Nginx errors: an OCSP validation failure prevents client-certificate authentication.
Stapling the server-certificate OCSP response
Client-certificate validation above and server-certificate OCSP stapling are separate functions. Stapling lets Nginx obtain a signed status response for its own server certificate and send it during the TLS handshake. This avoids each browser querying the issuing CA and improves client privacy.6
First check whether the server certificate contains an OCSP responder URI:
$ openssl x509 -in /etc/ssl/certs/Nginx2404_Bundle.pem -noout -ocsp_uri
If the command returns a supported URI, create /etc/ssl/certs/Nginx2404_CA.pem containing the issuing, intermediate, and root CA certificates in PEM format. Then enable stapling and response verification:
ssl_stapling on;
ssl_stapling_verify on;
ssl_trusted_certificate /etc/ssl/certs/Nginx2404_CA.pem;
resolver 194.126.115.18;
Do not enable stapling when the issuing CA does not provide an OCSP service. After reloading Nginx, verify the stapled response:
$ openssl s_client -connect Nginx2404.octox.demo:443 \
    -servername Nginx2404.octox.demo -status </dev/null
The output must contain a successful OCSP response and a good certificate status. Monitor refresh errors and ensure the server can reach the responder.
Recommended security settings for Nginx
SSL/TLS
Do not rely on the Nginx or operating-system defaults to select TLS protocol versions. Disable TLS 1.0 and TLS 1.1. New and updated deployments should enable only TLS 1.3 by default.
Add TLS 1.2 only as a documented exception when the service must support clients from 2020 or earlier, or when a client certificate must be requested after the initial TLS connection has been established. When TLS 1.2 is enabled, configure an explicit secure cipher-suite allowlist.
TLS 1.3 configuration:
ssl_protocols TLSv1.3;
For a documented compatibility exception, enable TLS 1.2 and TLS 1.3:
ssl_protocols TLSv1.2 TLSv1.3;
Nginx requests client certificates at the initial handshake, so TLS 1.2 renegotiation is not required for the authentication flow in this guide. The configuration below disables it explicitly.
When the TLS implementation and deployed clients provide production support, prioritize the hybrid X25519MLKEM768 group. This guide does not hard-code a group setting because support and the standardized identifier depend on the installed OpenSSL version. Confirm the effective group with a current TLS scanner before relying on it.
If you want to make the change at the server level, modify the parameter ssl_protocols in the file /etc/nginx/nginx.conf.
More information about the recommendations for the use of the TLS protocol can be found in the cryptographic algorithms life cycle report ordered by RIA at https://www.id.ee/en/article/cryptographic-algorithms-life-cycle-reports-2/.
Cipher suites
Configure an explicit allowlist instead of relying on OpenSSL aliases such as HIGH. For TLS 1.3, enable the following suites in this order:
ssl_conf_command Ciphersuites TLS_AES_256_GCM_SHA384:TLS_CHACHA20_POLY1305_SHA256:TLS_AES_128_GCM_SHA256;
TLS_AES_128_CCM_SHA256 may be used only as a fallback when AES-GCM and ChaCha20-Poly1305 are unavailable. Do not enable CCM_8 suites.
When the documented TLS 1.2 compatibility exception applies, enable only the three ECDHE-ECDSA and AEAD suites below. This matches the ECDSA-only certificate profile used in this guide:
ssl_ciphers 'ECDHE-ECDSA-AES128-GCM-SHA256:ECDHE-ECDSA-AES256-GCM-SHA384:ECDHE-ECDSA-CHACHA20-POLY1305';
The ssl_ciphers directive controls TLS 1.2 and older versions; ssl_conf_command Ciphersuites controls TLS 1.3 through OpenSSL. The TLS 1.2 list excludes RSA authentication and key exchange, static DH/ECDH, CBC, CCM_8, and non-AEAD suites.
You can also configure these directives at the server level in /etc/nginx/nginx.conf. Check the effective list with openssl ciphers -v and verify the negotiated protocol and suite with a current TLS scanner after every configuration change.
Compression and renegotiation
Keep TLS compression and TLS 1.2 renegotiation disabled explicitly:
ssl_conf_command Options -Compression,NoRenegotiation;
HTTP response compression is separate from TLS compression and can disclose secrets when a response contains both attacker-controlled input and sensitive data. Set gzip off; for sensitive dynamic locations and also disable any configured Brotli module there. If response compression must remain enabled, the application must prevent cross-site request forgery and mitigate response-length leakage.
More information about the recommendations for the use of the cipher suites can be found in the cryptographic algorithms life cycle report ordered by RIA at https://www.id.ee/en/article/cryptographic-algorithms-life-cycle-reports-2/.
ssl_prefer_server_ciphers
Preferring server ciphers over user ciphers can be enabled with ssl_prefer_server_ciphers. Set its value to on in the configuration file.
Additional filtering of client certificates
Trusting a CA chain does not prove that the leaf certificate is an ID-card authentication certificate. Different certificate products can share a root or intermediate CA. Before accepting the authenticated identity, require all of the following:
- Nginx successfully validates the complete certificate chain;
- the issuer is an explicitly allowed intermediate CA;
extendedKeyUsagepermits TLS web-client authentication;- the leaf certificate’s
X509v3 CertificatePoliciesextension (2.5.29.32) contains both the NCP+ authentication-policy OID and an allowed document-policy OID for the certificate’s CA generation.7
For production certificates covered by this guide, use this allowlist:
# Required in every accepted authentication certificate
0.4.0.2042.1.2

# ESTEID2018 - require one of these document-policy OIDs
1.3.6.1.4.1.51361.1.1.1
1.3.6.1.4.1.51361.1.1.2
1.3.6.1.4.1.51361.1.1.3
1.3.6.1.4.1.51361.1.1.4
1.3.6.1.4.1.51361.1.1.5
1.3.6.1.4.1.51361.1.1.6
1.3.6.1.4.1.51361.1.1.7
1.3.6.1.4.1.51455.1.1.1

# ESTEID2025 - require one of these document-policy OIDs
1.3.6.1.4.1.51361.2.1.1
1.3.6.1.4.1.51361.2.1.2
1.3.6.1.4.1.51361.2.1.3
1.3.6.1.4.1.51361.2.1.4
1.3.6.1.4.1.51361.2.1.5
1.3.6.1.4.1.51361.2.1.6
1.3.6.1.4.1.51455.2.1.1
Correlate the document-policy OID with the validated issuer: an ESTEID2018 certificate must not be accepted using an ESTEID2025 policy OID, or vice versa. The common NCP+ OID is not product-specific and is insufficient on its own. Do not add test OIDs, such as Zetes OIDs prefixed with 2.999, to a production allowlist.
Nginx does not provide a directive that can reliably apply an allowlist to the policy OIDs inside CertificatePolicies. Perform that check in the application or an authentication gateway. Do not infer the certificate product from its subject, issuer, or EKU alone, and do not treat the anyPolicy OID (2.5.29.32.0) as proof of an ID-card policy.
As a preliminary, defence-in-depth check, reject certificates whose issuer CA name is not ESTEID2018 or ESTEID2025. Add these conditions to the server section after the TLS configuration:
# Preliminary filter by intermediate CA name
set $trusted_client_issuer 0;

if ($ssl_client_i_dn ~ "^CN=ESTEID2018,") {
    set $trusted_client_issuer 1;
}

if ($ssl_client_i_dn ~ "^CN=ESTEID2025,") {
    set $trusted_client_issuer 1;
}

if ($trusted_client_issuer = 0) {
    return 403;
}
With these conditions, Nginx rejects a certificate unless its issuer is ESTEID2018 or ESTEID2025. This issuer check does not replace the certificate-policy check.
For an HTTP upstream, overwrite a dedicated request header with the verified leaf certificate:
proxy_set_header X-Client-Certificate $ssl_client_escaped_cert;
The application must URL-decode and parse the certificate, then reject authentication unless both the NCP+ OID and a document-policy OID matching the issuer are present. Only trust this header when the application is reachable exclusively through the trusted Nginx proxy. Other application interfaces should use their native TLS client-certificate integration.
To inspect the extension while testing an exported certificate:
$ openssl x509 -in client.pem -noout -text
Check the X509v3 Certificate Policies section against the current policy and certificate-profile sources cited above. Test at least one accepted ID-card certificate and certificates for other products issued in related hierarchies, including Mobile-ID where applicable.
Note: If you are using another feature to filter network traffic, the secure configuration should be implemented there, too. SK has published information about the F5 configuration in the chapter ‘Only accept certificates with trusted key usage’ in the following article: https://github.com/SK-EID/smart-id-documentation/wiki/Secure-Implementation-Guide
Note: SK’s recommendations for secure ID-card authentication are published here in the chapter ‘Defense: implement ID-card authentication securely’: https://github.com/SK-EID/smart-id-documentation/wiki/Secure-Implementation-Guide
Enabling HTTP Strict Transport Security (HSTS)
To enable HSTS for the Nginx webpage, add the add_header Strict-Transport-Security line to the configuration file.
# Other recommended security and optimization settings.
ssl_prefer_server_ciphers on;
add_header Strict-Transport-Security "max-age=31536000; includeSubDomains; preload" always;
ssl_session_cache    shared:SSL:10m;
ssl_session_timeout  1h;
ssl_session_tickets  on;
Additional possibilities
In addition to TLS and cipher suite configuration, you should pay attention to the security of the Nginx server from the following aspects:
- Keep the operating system up to date.
- Keep Nginx up to date.
- Disable presenting server information.
- Disable HTTP requests.
- Install and configure Naxsi.
- Monitor with Monit.
- Configure X-XSS Protection.
- Configure X-Frame-Options.
- Configure X-Content-Type-Options.
- Configure Content Security Policy (CSP).
- …
The above is a sample list of ways to improve Nginx security. Detailed recommendations are available online: https://www.google.com/search?q=how+to+secure+nginx+server.
Appendix
EID_Bundle.pem
# EE-GovCA2018
-----BEGIN CERTIFICATE-----
MIIE+DCCBFmgAwIBAgIQMLOwlXoR0oFbj52nmRsnezAKBggqhkjOPQQDBDBaMQsw
CQYDVQQGEwJFRTEbMBkGA1UECgwSU0sgSUQgU29sdXRpb25zIEFTMRcwFQYDVQRh
DA5OVFJFRS0xMDc0NzAxMzEVMBMGA1UEAwwMRUUtR292Q0EyMDE4MB4XDTE4MDkw
NTA5MTEwM1oXDTMzMDkwNTA5MTEwM1owWjELMAkGA1UEBhMCRUUxGzAZBgNVBAoM
ElNLIElEIFNvbHV0aW9ucyBBUzEXMBUGA1UEYQwOTlRSRUUtMTA3NDcwMTMxFTAT
BgNVBAMMDEVFLUdvdkNBMjAxODCBmzAQBgcqhkjOPQIBBgUrgQQAIwOBhgAEAMcb
/dmAcVo/b2azEPS6CfW7fEA2KuHKC53D7ShVNvLz4QUjCdTXjds/4u99jUoYEQec
luVVzMlgEJR1nkN2eOrLAZYxPjwG5HiI1iZEyW9QKVdeEgyvhzWWTNHGjV3HdZRv
7L9o4533PtJAyqJq9OTs6mjsqwFXjH49bfZ6CGmzUJsHo4ICvDCCArgwEgYDVR0T
AQH/BAgwBgEB/wIBATAOBgNVHQ8BAf8EBAMCAQYwNAYDVR0lAQH/BCowKAYIKwYB
BQUHAwkGCCsGAQUFBwMCBggrBgEFBQcDBAYIKwYBBQUHAwEwHQYDVR0OBBYEFH4p
Vuc0knhOd+FvLjMqmHHB/TSfMB8GA1UdIwQYMBaAFH4pVuc0knhOd+FvLjMqmHHB
/TSfMIICAAYDVR0gBIIB9zCCAfMwCAYGBACPegECMAkGBwQAi+xAAQIwMgYLKwYB
BAGDkSEBAQEwIzAhBggrBgEFBQcCARYVaHR0cHM6Ly93d3cuc2suZWUvQ1BTMA0G
CysGAQQBg5EhAQECMA0GCysGAQQBg5F/AQEBMA0GCysGAQQBg5EhAQEFMA0GCysG
AQQBg5EhAQEGMA0GCysGAQQBg5EhAQEHMA0GCysGAQQBg5EhAQEDMA0GCysGAQQB
g5EhAQEEMA0GCysGAQQBg5EhAQEIMA0GCysGAQQBg5EhAQEJMA0GCysGAQQBg5Eh
AQEKMA0GCysGAQQBg5EhAQELMA0GCysGAQQBg5EhAQEMMA0GCysGAQQBg5EhAQEN
MA0GCysGAQQBg5EhAQEOMA0GCysGAQQBg5EhAQEPMA0GCysGAQQBg5EhAQEQMA0G
CysGAQQBg5EhAQERMA0GCysGAQQBg5EhAQESMA0GCysGAQQBg5EhAQETMA0GCysG
AQQBg5EhAQEUMA0GCysGAQQBg5F/AQECMA0GCysGAQQBg5F/AQEDMA0GCysGAQQB
g5F/AQEEMA0GCysGAQQBg5F/AQEFMA0GCysGAQQBg5F/AQEGMDEGCisGAQQBg5Eh
CgEwIzAhBggrBgEFBQcCARYVaHR0cHM6Ly93d3cuc2suZWUvQ1BTMBgGCCsGAQUF
BwEDBAwwCjAIBgYEAI5GAQEwCgYIKoZIzj0EAwQDgYwAMIGIAkIBk698EqetY9Tt
6HwO50CfzdIIjKmlfCI34xKdU7J+wz1tNVu2tHJwEhdsH0e92i969sRDp1RNPlVh
4XFJzI3oQFQCQgGVxmcuVnsy7NUscDZ0erwovmbFOsNxELCANxNSWx5xMqzEIhV8
46opxu10UFDIBBPzkbBenL4h+g/WU7lG78fIhA==
-----END CERTIFICATE-----
# ESTEID2018
-----BEGIN CERTIFICATE-----
MIIFVzCCBLigAwIBAgIQdUf6rBR0S4tbo2bU/mZV7TAKBggqhkjOPQQDBDBaMQsw
CQYDVQQGEwJFRTEbMBkGA1UECgwSU0sgSUQgU29sdXRpb25zIEFTMRcwFQYDVQRh
DA5OVFJFRS0xMDc0NzAxMzEVMBMGA1UEAwwMRUUtR292Q0EyMDE4MB4XDTE4MDky
MDA5MjIyOFoXDTMzMDkwNTA5MTEwM1owWDELMAkGA1UEBhMCRUUxGzAZBgNVBAoM
ElNLIElEIFNvbHV0aW9ucyBBUzEXMBUGA1UEYQwOTlRSRUUtMTA3NDcwMTMxEzAR
BgNVBAMMCkVTVEVJRDIwMTgwgZswEAYHKoZIzj0CAQYFK4EEACMDgYYABAHHOBlv
7UrRPYP1yHhOb7RA/YBDbtgynSVMqYdxnFrKHUXh6tFkghvHuA1k2DSom1hE5kqh
B5VspDembwWDJBOQWQGOI/0t3EtccLYjeM7F9xOPdzUbZaIbpNRHpQgVBpFX0xpL
TgW27MpIMhU8DHBWFpeAaNX3eUpD4gC5cvhsK0RFEqOCAx0wggMZMB8GA1UdIwQY
MBaAFH4pVuc0knhOd+FvLjMqmHHB/TSfMB0GA1UdDgQWBBTZrHDbX36+lPig5L5H
otA0rZoqEjAOBgNVHQ8BAf8EBAMCAQYwEgYDVR0TAQH/BAgwBgEB/wIBADCCAc0G
A1UdIASCAcQwggHAMAgGBgQAj3oBAjAJBgcEAIvsQAECMDIGCysGAQQBg5EhAQEB
MCMwIQYIKwYBBQUHAgEWFWh0dHBzOi8vd3d3LnNrLmVlL0NQUzANBgsrBgEEAYOR
IQEBAjANBgsrBgEEAYORfwEBATANBgsrBgEEAYORIQEBBTANBgsrBgEEAYORIQEB
BjANBgsrBgEEAYORIQEBBzANBgsrBgEEAYORIQEBAzANBgsrBgEEAYORIQEBBDAN
BgsrBgEEAYORIQEBCDANBgsrBgEEAYORIQEBCTANBgsrBgEEAYORIQEBCjANBgsr
BgEEAYORIQEBCzANBgsrBgEEAYORIQEBDDANBgsrBgEEAYORIQEBDTANBgsrBgEE
AYORIQEBDjANBgsrBgEEAYORIQEBDzANBgsrBgEEAYORIQEBEDANBgsrBgEEAYOR
IQEBETANBgsrBgEEAYORIQEBEjANBgsrBgEEAYORIQEBEzANBgsrBgEEAYORIQEB
FDANBgsrBgEEAYORfwEBAjANBgsrBgEEAYORfwEBAzANBgsrBgEEAYORfwEBBDAN
BgsrBgEEAYORfwEBBTANBgsrBgEEAYORfwEBBjAqBgNVHSUBAf8EIDAeBggrBgEF
BQcDCQYIKwYBBQUHAwIGCCsGAQUFBwMEMGoGCCsGAQUFBwEBBF4wXDApBggrBgEF
BQcwAYYdaHR0cDovL2FpYS5zay5lZS9lZS1nb3ZjYTIwMTgwLwYIKwYBBQUHMAKG
I2h0dHA6Ly9jLnNrLmVlL0VFLUdvdkNBMjAxOC5kZXIuY3J0MBgGCCsGAQUFBwED
BAwwCjAIBgYEAI5GAQEwMAYDVR0fBCkwJzAloCOgIYYfaHR0cDovL2Muc2suZWUv
RUUtR292Q0EyMDE4LmNybDAKBggqhkjOPQQDBAOBjAAwgYgCQgDeuUY4HczUbFKS
002HZ88gclgYdztHqglENyTMtXE6dMBRnCbgUmhBCAA0mJSHbyFJ8W9ikLiSyurm
kJM0hDE9KgJCASOqA405Ia5nKjTJPNsHQlMi7KZsIcTHOoBccx+54N8ZX1MgBozJ
mT59rZY/2/OeE163BAwD0UdUQAnMPP6+W3Vd
-----END CERTIFICATE-----
# EEGovCA2025
-----BEGIN CERTIFICATE-----
MIICljCCAhygAwIBAgIUKbkXJo8FWjthNs7Hgduq1RiXqwswCgYIKoZIzj0EAwMw
WDEUMBIGA1UEAwwLRUVHb3ZDQTIwMjUxFzAVBgNVBGEMDk5UUkVFLTE3MDY2MDQ5
MRowGAYDVQQKDBFaZXRlcyBFc3RvbmlhIE/DnDELMAkGA1UEBhMCRUUwHhcNMjUw
NTA2MDgxODEzWhcNNDAwNTA1MDgxODEyWjBYMRQwEgYDVQQDDAtFRUdvdkNBMjAy
NTEXMBUGA1UEYQwOTlRSRUUtMTcwNjYwNDkxGjAYBgNVBAoMEVpldGVzIEVzdG9u
aWEgT8OcMQswCQYDVQQGEwJFRTB2MBAGByqGSM49AgEGBSuBBAAiA2IABH0zMU4D
UN/Ay6gUdWzMUDAYFaau0flpuuicO2bfK7kHNGw+psRRn6DaF/4cVQd8qHxbDF2x
N4jJf1bSpQHLsc2RZHSCI8qb4E9GmB5MDoVVxiXnBHOOW3+55Qm/BfwcwaOBpjCB
ozASBgNVHRMBAf8ECDAGAQH/AgEBMB8GA1UdIwQYMBaAFKqAqJsPu0umfsUC9HLN
LPGlKdm3MD0GA1UdIAQ2MDQwMgYEVR0gADAqMCgGCCsGAQUFBwIBFhxodHRwczov
L3JlcG9zaXRvcnkuZWlkcGtpLmVlMB0GA1UdDgQWBBSqgKibD7tLpn7FAvRyzSzx
pSnZtzAOBgNVHQ8BAf8EBAMCAQYwCgYIKoZIzj0EAwMDaAAwZQIwOy8+eV+yYNXt
XcEEdOuQd60O7lXucK3W4cDewxEoEXb4iTYFswWUZq3DacfmeE+/AjEAkzHeNdru
QqKfvqTFB3eNRnMycNcnJ3rmGe37u9zgH8wnQUuMhUClOGxeRcK4NV9I
-----END CERTIFICATE-----
# ESTEID2025
-----BEGIN CERTIFICATE-----
MIIDDzCCApagAwIBAgIUUFQrcGtK7/jCP+GyAOTPvbglGlcwCgYIKoZIzj0EAwMw
WDEUMBIGA1UEAwwLRUVHb3ZDQTIwMjUxFzAVBgNVBGEMDk5UUkVFLTE3MDY2MDQ5
MRowGAYDVQQKDBFaZXRlcyBFc3RvbmlhIE/DnDELMAkGA1UEBhMCRUUwHhcNMjUw
NTA3MTMyMDA3WhcNNDAwNTAzMTMyMDA2WjBXMRMwEQYDVQQDDApFU1RFSUQyMDI1
MRcwFQYDVQRhDA5OVFJFRS0xNzA2NjA0OTEaMBgGA1UECgwRWmV0ZXMgRXN0b25p
YSBPw5wxCzAJBgNVBAYTAkVFMHYwEAYHKoZIzj0CAQYFK4EEACIDYgAEdSEmb1An
xN7G22CCEQ3ts2YZNieTUZP4Vc4iObhmL/um4EXkiA4HgyCiR5T6olKAEkPdxFBs
fmcLoPN+TmBO8ZpLGEqy1Vwf59ahDW7dQiLXTIAEiGCoXSWI9MvtHDZ2o4IBIDCC
ARwwEgYDVR0TAQH/BAgwBgEB/wIBADAfBgNVHSMEGDAWgBSqgKibD7tLpn7FAvRy
zSzxpSnZtzBABggrBgEFBQcBAQQ0MDIwMAYIKwYBBQUHMAKGJGh0dHA6Ly9jcnQu
ZWlkcGtpLmVlL0VFR292Q0EyMDI1LmNydDA9BgNVHSAENjA0MDIGBFUdIAAwKjAo
BggrBgEFBQcCARYcaHR0cHM6Ly9yZXBvc2l0b3J5LmVpZHBraS5lZTA1BgNVHR8E
LjAsMCqgKKAmhiRodHRwOi8vY3JsLmVpZHBraS5lZS9FRUdvdkNBMjAyNS5jcmww
HQYDVR0OBBYEFJLAOLC4NhJo9crtZu5HKohtpo3oMA4GA1UdDwEB/wQEAwIBBjAK
BggqhkjOPQQDAwNnADBkAjANipgLQqdM985dSFZfKvU9A7Sz2YdmmUSZBxu0lL7Q
XKzqa0ZDyXmf03NPLNAC6dICMBQiROZbLoPezO9LDl847UbENx85hloLlzweWjqP
rY++Xj8FjCD1C9hnblsVgj3XAA==
-----END CERTIFICATE-----
Nginx_EID_Demo.conf
server {
    listen 80;
    listen [::]:80;
    server_name Nginx2404.octox.demo;
    return 301 https://Nginx2404.octox.demo;
}

server {
    # SSL configuration
    listen 443 ssl;
    listen [::]:443 ssl;
    root /var/www/Nginx2404;
    index index.html;
    server_name Nginx2404.octox.demo;

    # Certificates
    ssl_certificate /etc/ssl/certs/Nginx2404_Bundle.pem;
    ssl_certificate_key /etc/ssl/private/Nginx2404.key;
    ssl_client_certificate /etc/ssl/certs/EID_Bundle.pem;
    ssl_verify_client on;
    ssl_verify_depth 2;

    # Client-certificate revocation checking
    ssl_ocsp leaf;
    ssl_ocsp_cache shared:OCSP:10m;
    resolver 194.126.115.18;

    # Server-certificate OCSP stapling - enable only if its CA supports OCSP
    # ssl_stapling on;
    # ssl_stapling_verify on;
    # ssl_trusted_certificate /etc/ssl/certs/Nginx2404_CA.pem;

    # TLS
    ssl_protocols TLSv1.3;
    ssl_conf_command Ciphersuites TLS_AES_256_GCM_SHA384:TLS_CHACHA20_POLY1305_SHA256:TLS_AES_128_GCM_SHA256;
    # Documented TLS 1.2 compatibility exception:
    # ssl_protocols TLSv1.2 TLSv1.3;
    # ssl_ciphers 'ECDHE-ECDSA-AES128-GCM-SHA256:ECDHE-ECDSA-AES256-GCM-SHA384:ECDHE-ECDSA-CHACHA20-POLY1305';
    ssl_conf_command Options -Compression,NoRenegotiation;
    ssl_prefer_server_ciphers on;

    # HSTS and session settings
    add_header Strict-Transport-Security "max-age=31536000; includeSubDomains; preload" always;
    ssl_session_cache    shared:SSL:10m;
    ssl_session_timeout  1h;
    ssl_session_tickets  on;

    # Partial filtering by issuer CA name; the application must also
    # allowlist ID-card CertificatePolicies OIDs
    set $trusted_client_issuer 0;

    if ($ssl_client_i_dn ~ "^CN=ESTEID2018,") {
        set $trusted_client_issuer 1;
    }

    if ($ssl_client_i_dn ~ "^CN=ESTEID2025,") {
        set $trusted_client_issuer 1;
    }

    if ($trusted_client_issuer = 0) {
        return 403;
    }

    location / {
        try_files $uri $uri/ =404;
    }
}
-
In addition to the certificate attributes C, O, and CN described on the command line, it is also possible to describe the attributes L, OU, and S if desired. However, only CN can also be used. ↩
-
Modern browsers trust the certificate only when the requested hostname matches at least one of its SAN DNS names. ↩
-
The HTTP sections in the configuration file are not necessary and are shown here as an example of the HTTP -> HTTPS redirection. ↩
-
The certificate check is also doable with certificate revocation lists (CRL), but this is not covered in this document, as the OCSP-based solution is preferred. ↩
-
Resolver – replace the IP address here with any DNS server that can resolve public DNS addresses. You can also use the DNS server of your intranet for this. ↩
-
The allowlist is based on the ESTEID2018 certificate policy v4.0 and the ESTEID2025 certificate policy v2.0, supplemented by the Zetes certificate profiles. Check the Zetes repository and the service providers’ current policies and profiles before changing the production allowlist. ↩