ID-software administrator view
Version: 26.07/1
Published by: RIA
Version information
| Date | Version | Changes/Notices |
|---|---|---|
| 21/01/2019 | 19.01/1 | Public version, based on the 18.12 software. |
| 24/07/2019 | 19.7/1 | Added the .exe installation key for automatic activation of the Chrome signing support and updated to software version 19.7. — Changed by: Kristel Merilain |
| 20/11/2019 | 19.10/1 | Changed the default installation of the AWP component OTCertSynchronizer and updated to software version 19.10. — Changed by: Kristjan Vaikla |
| 31/01/2020 | 20.01/1 | Added the print summary registry location for the default view in DigiDoc4 client and updated to software version 20.01. — Changed by: Kristjan Vaikla |
| 02/07/2020 | 20.05/1 | Added the AWP 5.3.4 SR1 component parameter for the registration key, which includes translation for Windows servers, and updated to software version 20.05. — Changed by: Kristjan Vaikla |
| 11/10/2020 | 20.10/1 | Removed the TeRa timestamping application and updated to software version 20.10. — Changed by: Kristjan Vaikla |
| 28/02/2022 | 22.02/1 | Added the Web eID update, removed outdated information, added information about new installation options, described the central deployment of browser extensions. Updated to software version 22.02/1. — Changed by: Urmas Vanem |
| 29/03/2022 | 22.03/1 | Fixed the Chrome Web eID extension value in the chapter on the central deployment of extensions. — Changed by: Urmas Vanem |
| 13/04/2022 | 22.04/1 | Changed the default location for adding Web eID extensions. — Changed by: Tarmo Nurmela |
| 21/04/2022 | 22.04/2 | Added the possibility to install the Idemia minidriver automatically with the MSI package (without card/reader, RDP case). — Changed by: Urmas Vanem |
| 13/06/2022 | 22.06/1 | Added a chapter about the software update logic and a description of Chrome policies Configure native messaging blocklist/allowlist. — Changed by: Urmas Vanem |
| 29/07/2022 | 22.07/1 | The base version of the software described in the document has now been updated to 22.06.0.1930, changes related to the new version have been described and outdated information has been removed. Added information about the central policies of Firefox. — Changed by: Kristel Merilain, Urmas Vanem |
| 11/08/2022 | 22.08/1 | Added a description of the ID-software update process. — Changed by: Urmas Vanem |
| 31/08/2022 | 22.08/2 | Corrected the information in the tables in the chapter ‘The behaviour of browser extensions by extension during installation’. — Changed by: Kristel Merilain |
| 14/12/2022 | 22.12/1 | Changed the description of the behaviour of Edge and Chrome web browsers during installation and updated to software version 22.11. — Changed by: Kristjan Vaikla |
| 29/12/2022 | 22.12/1 | Updated the information in the transform files of the ‘AWP’, Digidoc_ShellExt, and Web eID chapters. — Changed by: Märt Hirtentreu |
| 24/10/2024 | 24.10/1 | Removed Gemalto minidriver, updated installation logic, changed how web browsers install extensions, etc. — Changed by: Urmas Vanem |
| 16/06/2025 | 25.06/1 | Replaced AWP with IDPlug. — Changed by: Raul Metsma |
| 31/10/2025 | 25.10/1 | Added SmartCard Client. — Changed by: Raul Kaidro |
| 19/05/2026 | 26.04/1 | Published as online documentation. Added Edge NativeMessagingAllowlist configuration. — Changed by: Raul Metsma |
| 11/06/2026 | 26.06/1 | Updated GPO-MSI distribution guidance and screenshots. — Changed by: Raul Metsma |
| 29/07/2026 | 26.07/1 | Added Microsoft Intune deployment guidance for the ID-software and for central extension management. — Changed by: Raul Metsma |
- ID-software administrator view
Introduction
This document covers ID-software installation and management from an IT administrator perspective. The images are illustrative and based on version 26.4.20.8412.
The ID-software supports the following operating systems and browsers:
- Operating systems: Windows 10, Windows 11, Windows Server 2019, Windows Server 2022, Windows Server 2025.
- Browsers: versions of Mozilla Firefox, Google Chrome and Microsoft Edge Chromium supported by the aforementioned operating systems.
More detailed information about the changes in the latest ID-software version can be found at https://www.id.ee/en/article/id-software-versions-info-release-notes/.
ID-software overview
The ID-software installer is a single offline EXE file, Open-EID-26.4.20.8412.exe, which no longer supports the /layout command to extract MSI packages. MSI files can be downloaded separately from https://installer.id.ee/media/win/Open-EID.zip.
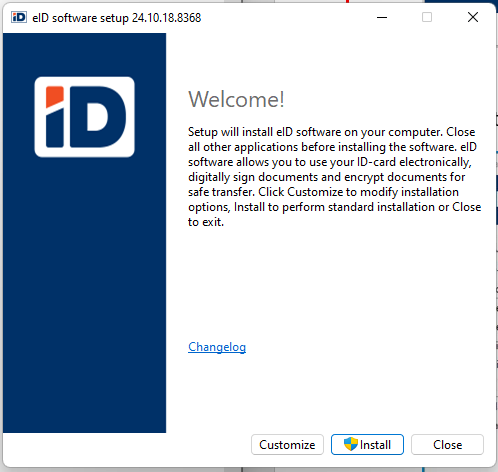
To install interactively with default settings, run the EXE file. To install only certain components, select Customize in the welcome window at the start of installation:
The customization options are:
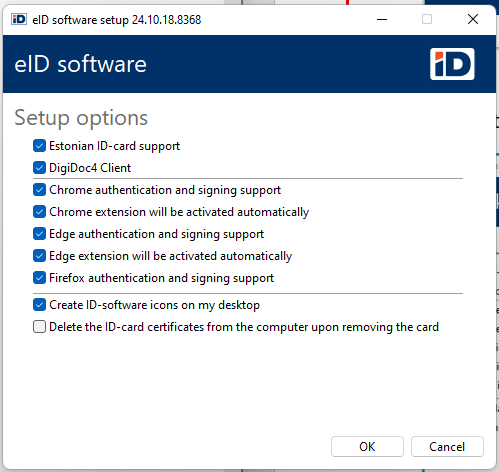
Brief overview of the components
The components are available separately as MSI packages from https://installer.id.ee/media/win/Open-EID.zip.
IDPlug
IDPlug is the software for the Idemia card, which also installs the minidriver for Idemia cards.
The component IDPlug Services is also part of the IDPlug. When it is installed and the smart card is removed from the card reader, all ID-card certificates are deleted from the Windows user certificate store. By default, the EXE installation will not install IDPlug Services and ID-card certificates are not removed from the certificate store. To install this component, the EXE installation must be started with the command line parameter InstallCertSynchronizer=1.
SmartCard Client
SmartCard Client is the software for the Thales card, which also installs the minidriver for Thales cards.
CertDelApp
When it is installed and the smart card is removed from the card reader, all ID-card certificates are deleted from the Windows user certificate store. By default, the EXE installation will not install CertDelApp and ID-card certificates are not removed from the certificate store when removing the card from the reader. To install this component, the exe installation must start with the command line parameter InstallCertSynchronizer=1.
Digidoc_ShellExt
This component installs the legacy Windows Explorer context-menu extension, which allows signing or encryption to be started in DigiDoc4 by right-clicking a file. On Windows 11, commands provided by this extension appear under Show more options. If the extension has already been loaded into Windows Explorer, installing or updating it may require restarting Explorer or the computer.
DigiDoc4
DigiDoc4 is an application that enables the signing, validation, encryption, and decryption of documents as well as managing the PINs and PUKs of ID-cards. Both the DigiDoc4 MSI and the Microsoft Store app install the modern Windows Explorer context-menu extension; the MSI does so through an AppX-based solution.
ID-updater
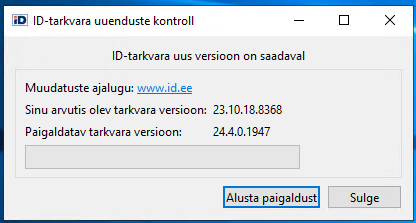
The ID-software EXE installer always installs ID-updater, which bundles shared third-party libraries (Qt, OpenSSL, etc.) required by other ID-software components. By default, the EXE installer also creates the scheduled task id updater task, which checks for new software once per week and offers any available update to the user. Creating the scheduled task can be disabled with AutoUpdate=0, but ID-updater is still installed. ID-updater is not required when the ID-software components are installed as separate MSI packages.
Web eID
Web eID allows Estonian ID-cards to be used for online authentication and signing. The Web eID component consists of a native app and extensions for the well-known web browsers Google Chrome, Mozilla Firefox and Microsoft Edge.
In enterprises
In medium and large organizations, ID-software is usually deployed and managed centrally. Common solutions include Microsoft Intune, Microsoft Configuration Manager (SCCM), and Active Directory Group Policy (AD/GPO).
SCCM
In addition to the configuration options available in the GUI, the following command-line parameters can be used for unattended installations:
ChromeSupport=0— the Chrome extension, registry entries, and native messaging manifest are not installed, 1 by default.EdgeSupport=0— the Edge extension, registry entries, and native messaging manifest are not installed, 1 by default.ForceChromeExtensionActivation2=1— the Chrome extension is activated automatically, 1 by default.ForceEdgeExtensionActivation2=1— the Edge extension is activated automatically, 1 by default.FirefoxSupport=0— the Firefox extension, registry entries, and native messaging manifest are not installed, 1 by default.InstallCertSynchronizer=1— installs the componentOTCertSynchronizer, 0 by default1.MinidriverInstall=0— the minidriver is not installed, 1 by default.Qdigidoc4Install=0— the DigiDoc software is not installed, 1 by default.IconsDesktop=0— the DigiDoc icon is not put on the desktop, 1 by default.AutoUpdate=0—id updater taskis not added to the task scheduler, 1 by default.
Note: The installation keys shown above are case sensitive.
Note: If
ChromeSupport,EdgeSupport, andFirefoxSupportare all set to 0, the native messaging application is not installed either.
For example, the command line Open-EID-<version>.exe /quiet AutoUpdate=0 IconsDesktop=0 installs the ID-software in unattended mode, does not activate automatic updates, and does not add the ID-software icons to the desktop.
By default, running the EXE installs the software with default settings.
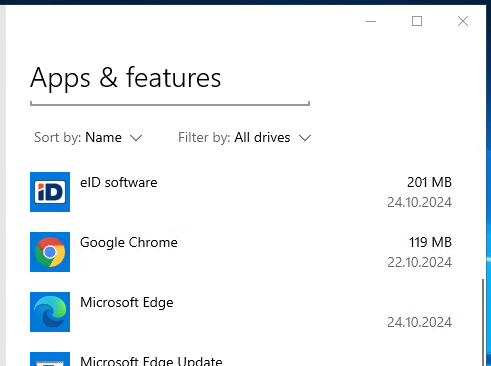
When using SCCM for ID-software installation, the simplest way is to create an installation package and install it into the computer with the default command line Open-EID-<version>.exe /quiet AutoUpdate=0.
As a result of this normal installation, the ID-software appears as usual in the software list:
AD/GPO
If you do not have a central software management system in the enterprise, but you can use the Group Policy functionality, you can also use MSI-based installations. It is recommended to make GPO installations computer-based.
Note: MSI packages can be used for both initial deployment and centrally managed updates. They do not automatically remove or migrate an existing EXE-based installation to MSI-based management. When moving from an EXE-based installation to MSI-based management, uninstall the EXE-based installation separately. For subsequent MSI updates, deploy the newer component packages through the central management solution and test the release-specific upgrade behavior before rollout.
For an overview of the MSI components, see Brief overview of the components above.
The MSI packages are embedded in the EXE but cannot be extracted from it. They can be downloaded separately from https://installer.id.ee/media/win/Open-EID.zip.
The following files are available as MSI packages:
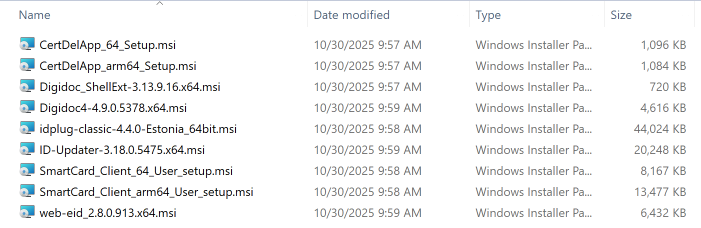
The MST files described below in the manual can be downloaded from the location https://www.id.ee/en/article/administrators-guide-for-administration-and-installation-of-open-eid/.
Note: MST files are updated alongside new MSI versions — always use the latest ones, as older versions will not work.
Below is a brief overview about how to configure GPO-MSI installations.
Note: Compared to earlier versions of this guide,
ID-updaterno longer needs to be installed for GPO-MSI deployments, and components no longer need transform files that force installation into the samePROGRAM FILES\Open-EIDfolder.
IDPlug
IDPlug is the minidriver and basic software for Idemia cards.
Unlike EXE installation (check the IDPlug component description), MSI install adds the component IDPlug Services by default. If you do not want to enable this component, you must use a transform file.
Options:
- To disable the component IDPlug Services:
- Add the transform file
DisableIDPlugServices.mst.
- Add the transform file
SmartCard Client
SmartCard Client is the minidriver and basic software for Thales cards.
CertDelApp
When installed, ID-card certificates are deleted from the Windows user certificate store when the smart card is removed from the card reader.
DigiDoc4
DigiDoc4 is a necessary component if you want to sign and encrypt documents as well as manage the PINs and PUKs of ID-cards.
Options:
- The default MSI installation does not install the necessary icons on the desktop. However, if desktop icons are required, the transform file
2410-DD-Shortcutmust also be added to the installation.
The DigiDoc4 MSI installs the modern Windows Explorer context-menu extension through an AppX-based solution.
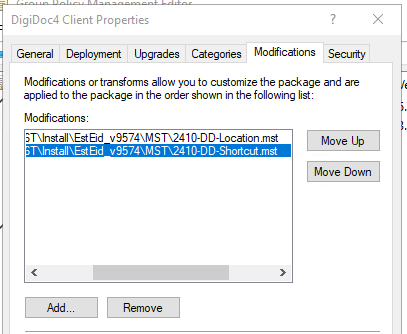
Adding the legacy right-click extension to Windows
The Digidoc_ShellExt MSI installs the legacy Windows Explorer context-menu extension. On Windows 11, commands provided by this extension appear under Show more options. Use it only when the legacy extension is required instead of the modern extension included with the DigiDoc4 MSI. If the legacy extension has already been loaded into Explorer, installing or updating it may require restarting Explorer or the computer.
Web eID
Browser extensions and native app.
The list of MSI custom packages in the GPMC management console looks like this:

For GPO-MSI installations, all installed programs also appear in the software list:
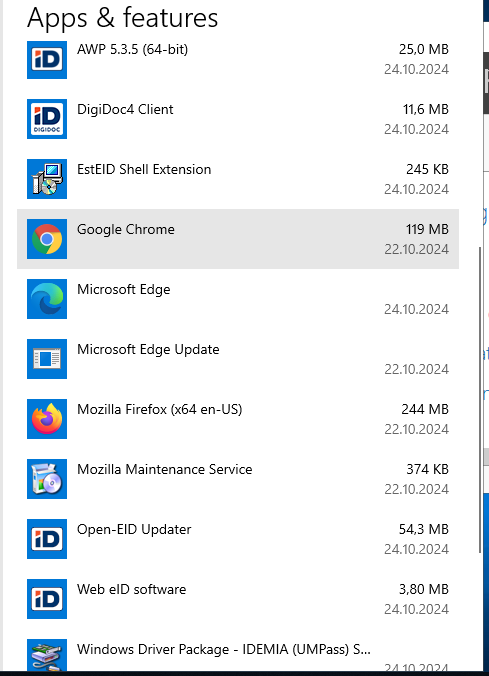
Note: The order of MSI installation components is not important, but the required minidriver must be installed because other components depend on it.
Note: MST files can be downloaded from https://www.id.ee/en/article/administrators-guide-for-administration-and-installation-of-open-eid/.
Note: It is also recommended to publish the related root and intermediate certificates in the domain to all servers and workstations automatically through the group policies.
Microsoft Intune application deployment
If you manage devices with Microsoft Intune, deploy the individual MSI packages described above as Win32 apps. ID-updater is not required for MSI deployments.
To package an MSI component for Intune deployment:
- Download the Microsoft Win32 Content Prep Tool (
IntuneWinAppUtil.exe) from https://github.com/microsoft/Microsoft-Win32-Content-Prep-Tool. - Put the component MSI and any required MST files in a separate source folder.
- Package the MSI into a
.intunewinfile using the tool. - In the Intune admin center, go to Apps > All apps > Create, choose the app type Windows app (Win32), and upload the resulting
.intunewinfile.
When run without command-line arguments, IntuneWinAppUtil.exe prompts for the source folder, setup file, and output folder. It also accepts command-line arguments, which are useful for scripting the packaging step:
IntuneWinAppUtil.exe -c Source -s "<actual component MSI filename>" -o Out -q
-c— source folder (all files needed for installation)-s— component MSI file to install-o— output folder for the resulting.intunewinfile-q— quiet mode, suppresses the interactive prompts (e.g. no confirmation is asked before overwriting an existing output file)
The install command, uninstall command, and detection rule are entered in the app creation wizard in the Intune admin center. The filenames below are placeholders; replace them with the actual versioned filenames from the downloaded Open-EID.zip:
- Program tab:
- Install command, for example:
msiexec /i "<actual Web eID MSI filename>" /quiet - Uninstall command:
msiexec /x "{PRODUCT-CODE}" /quiet - Install behavior: System
- Install command, for example:
- Detection rules tab — choose Manually configure detection rules, add an MSI rule, enter the release-specific MSI product code, and enable the MSI product version check.
- Assignments tab — assign the app to the desired device or user groups as Required to have it install automatically.
Note:
{PRODUCT-CODE}is a placeholder. When an MSI is selected as the setup file (-s), the Content Prep Tool reads its metadata and Intune can use the product code in an MSI detection rule. Verify the value shown in Intune and use the same GUID in the uninstall command. To inspect it before packaging, open the MSI in Orca, select thePropertytable, and read theValuein theProductCoderow. Product codes can differ between versions, architectures, and language packages, so concrete GUIDs are not listed in this guide.
Transform files are passed to MSI using the TRANSFORMS property, for example:
msiexec /i "<actual IDPlug MSI filename>" TRANSFORMS=DisableIDPlugServices.mst /quiet
If MSI components are deployed as separate Win32 apps, configure the required minidriver app as a dependency of the components that need it.
Note: The MSI components and transform files are the same as described in AD/GPO above.
Choosing how to deploy DigiDoc4
DigiDoc4 can be deployed either from Microsoft Store or as an MSI-based Win32 app. Use only one of these methods for a device group.
Option 1: Microsoft Store
DigiDoc4 is available from Microsoft Store. To deploy it through Intune, go to Apps > All apps > Create, choose Microsoft Store app (new), and search for DigiDoc4 or Store product ID 9PFPFK4DJ1S6. The app can then be assigned as Required or Available for enrolled devices.
The Store app provides DigiDoc4, including its file associations and the modern Windows Explorer context-menu extension. It does not replace the ID-card minidriver or the Web eID native application and browser extensions. Deploy these required components separately using the MSI packages described above.
Apps deployed from Microsoft Store through Intune are kept up to date automatically. Use this option when automatically receiving the latest DigiDoc4 release is acceptable; use the MSI-based Win32 deployment described above when each DigiDoc4 version must be tested and approved before rollout.
Option 2: MSI-based Win32 app
Package the DigiDoc4 MSI as described above. The MSI installs the modern Windows Explorer context-menu extension through an AppX-based solution. To add desktop shortcuts, include the 2410-DD-Shortcut.mst file in the source folder and use:
msiexec /i "<actual DigiDoc4 MSI filename>" TRANSFORMS=2410-DD-Shortcut.mst /quiet
The Digidoc_ShellExt MSI is not required for the modern context-menu extension. Deploy it separately only when the legacy Windows Explorer context-menu extension is required. On Windows 11, commands provided by this extension appear under Show more options. If the legacy extension has already been loaded into Explorer, installing or updating it may require restarting Explorer or the computer. The MSI-based option lets the organization test and approve each DigiDoc4 version before rollout, but updates must be managed in Intune.
Updating an Intune deployment
Microsoft Store updates DigiDoc4 automatically when the Store option is used. For MSI-based Win32 apps, publish each approved component update through Intune:
- Create a new
.intunewinpackage from the new component MSI. - Update the install and uninstall commands, MSI product code, and product version detection.
- Create a new Win32 app or update the existing app content. When creating a new app, configure it to supersede the previous version. If testing confirms that the new MSI upgrades the installed version in place, set Uninstall previous version to No; use Yes only when the previous package must be removed before installing the new one.
- Test the deployment and then assign the new version to the required groups.
Intune is responsible for deploying subsequent releases of all MSI-based ID-software components.
Deploying extensions centrally
Browser extensions can be deployed centrally via Group Policy or Microsoft Intune.
Please test configurations described below in your specific environment(s) before deployment.
Browser extension policies via AD/GPO
Chromium Edge
For Edge, you need to download the newest Edge policy framework from https://www.microsoft.com/en-us/edge/business/download and integrate it into your environment.
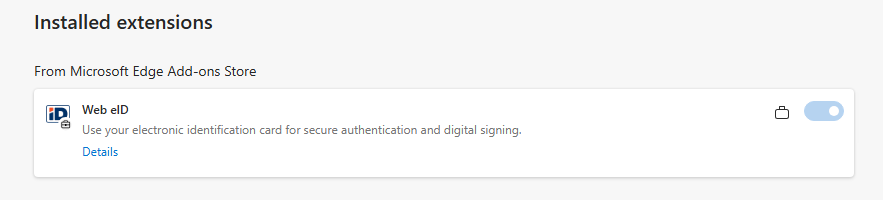
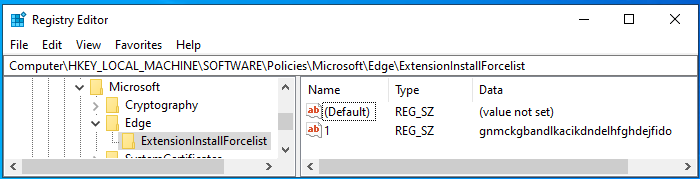
After enabling policies, you can create a new policy that makes the use of the Web eID extension automatic in the domain. For that, set the value of the field Computer Configuration/Policies/Administrative Templates/Microsoft Edge/Extensions — Control which extensions are installed silently to gnmckgbandlkacikdndelhfghdejfido.
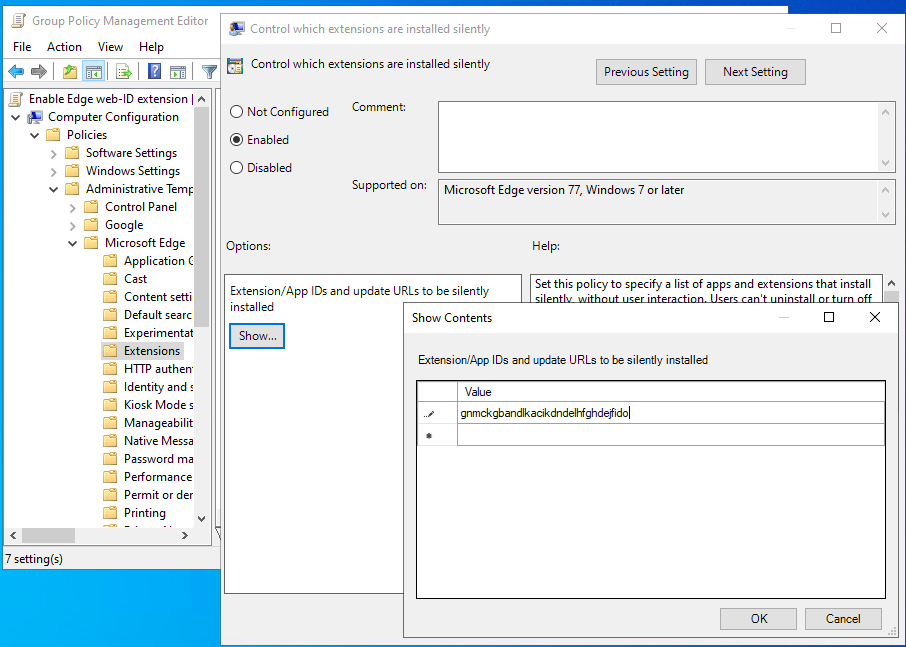
Additional configuration for native messaging
By default, all native messaging hosts are allowed in Edge. However, if the NativeMessagingBlocklist policy is set to *, Web eID signing will not work. To resolve this, eu.webeid must be added to the NativeMessagingAllowlist policy. For more information, see the NativeMessagingAllowlist Edge policy documentation.
Google Chrome
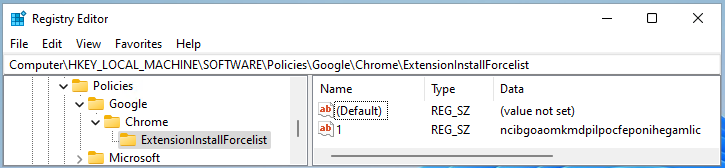
The Chrome policy is set during the installation of the ID-software. The following information written to the registry enables the Web eID extension in Chrome automatically:

However, if you want to centrally manage policies in Chrome, the following instructions may help.
To enable the Chrome extensions policies centrally, you need to download the newest template files from https://chromeenterprise.google/browser/download/#windows-tab and integrate those into the domain solution.
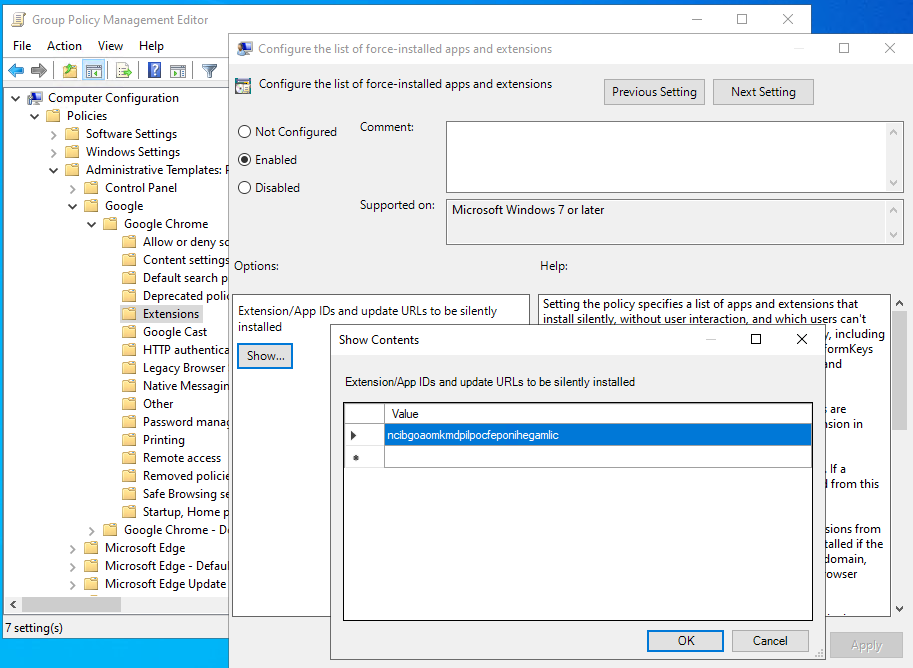
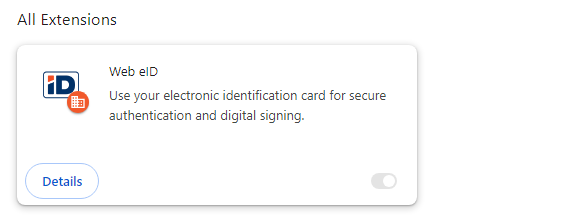
After enabling policies, you can create a new policy that makes the use of the Web eID extension automatic in the domain. For that, set the value of the field Computer Configuration/Policies/Administrative Templates/Google/Google Chrome/Extensions — Configure the list of force-installed apps and extensions to ncibgoaomkmdpilpocfeponihegamlic.
Additional configuration for native messaging
If the Configure native messaging blocklist property is set to * with Chrome policies, signing using the Chrome extension described above will not work. For example, attempting to sign on the test page https://hwcrypto.github.io/hwcrypto.js/sign.html produces the following output:
Debug: hwcrypto.js 0.0.13 with failing backend Chrome native messaging extension
getCertificate() failed: Error: technical_error
To overcome this problem, the host eu.webeid must be allowed in the Chrome policy Configure native messaging allowlist:
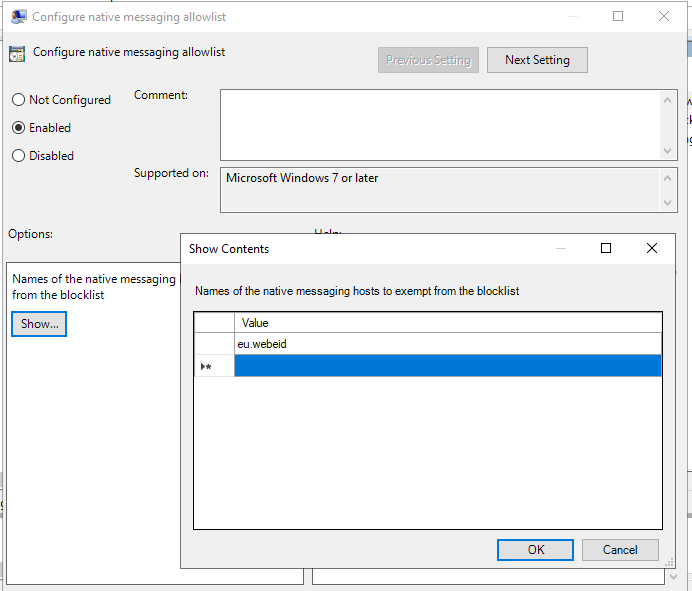
After applying the policy, signing on the webpage succeeds.
Debug: hwcrypto.js 0.0.13 with Chrome native messaging extension 2.0.1/2.0.0.552
Using certificate:
-----BEGIN CERTIFICATE-----
...
Mozilla Firefox
The Firefox policy is already set during the installation of the ID-software; the information reflected in the following image is written into the Windows registry. Using the aforementioned policy, the Web eID extension is automatically installed on Firefox:
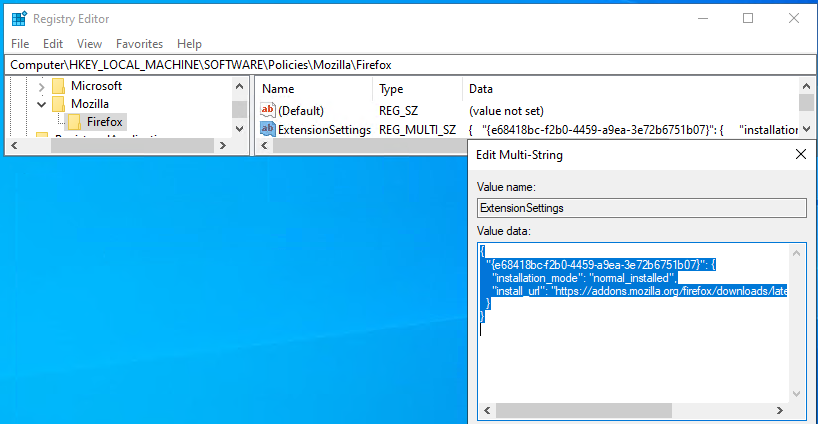
However, if you want to centrally manage policies for Firefox, the information below can be helpful.
To use central policies for Firefox, you need to download the newest Firefox administrative templates from https://github.com/mozilla/policy-templates/releases and integrate them to the domain solution.
After introducing the policies to the domain environment, you can create a new policy that makes the use of the Web eID extension for Firefox automatic in the domain. There are several options for this, but it is perhaps advisable to overwrite the policy already described during the installation. To do this, set the value of the field Computer Configuration/Policies/Administrative Templates/Mozilla/Firefox/Extensions — Extension Management to the following text:
{
  "{e68418bc-f2b0-4459-a9ea-3e72b6751b07}": {
    "installation_mode": "normal_installed",
    "install_url": "https://addons.mozilla.org/firefox/downloads/latest/web-eid-webextension/latest.xpi"
  }
}
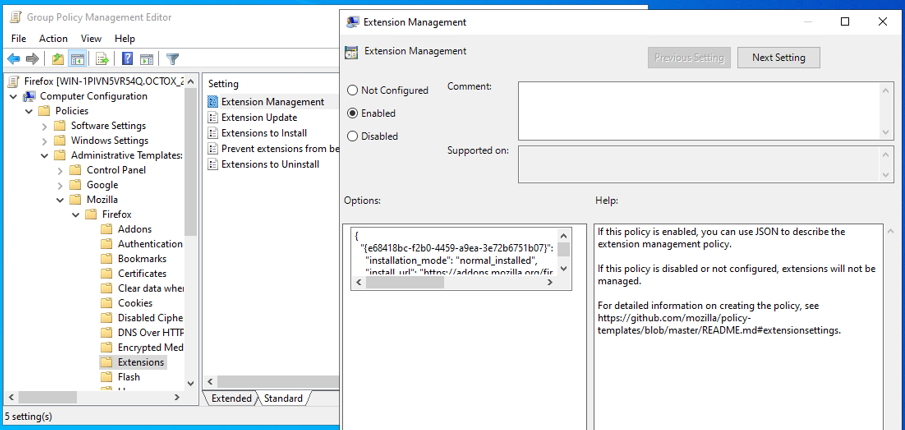
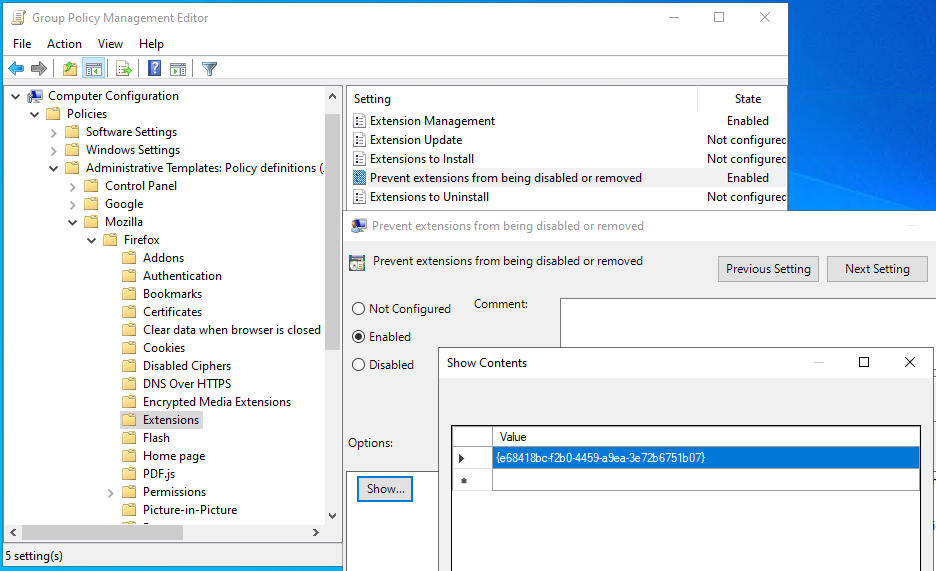
The corresponding information is written into the registry in the same place as during the installation of ID-software.
If you want to prevent the user from turning off the Web eID extension independently, one of the actions from the following list must be performed:
- Replace the text
normal_installedwith the textforce_installedin the value of the field described above; - Add the line
{e68418bc-f2b0-4459-a9ea-3e72b6751b07}to the listComputer Configuration/Policies/Administrative Templates/Mozilla/Firefox/Extensions — Prevent extensions from being disabled or removed.
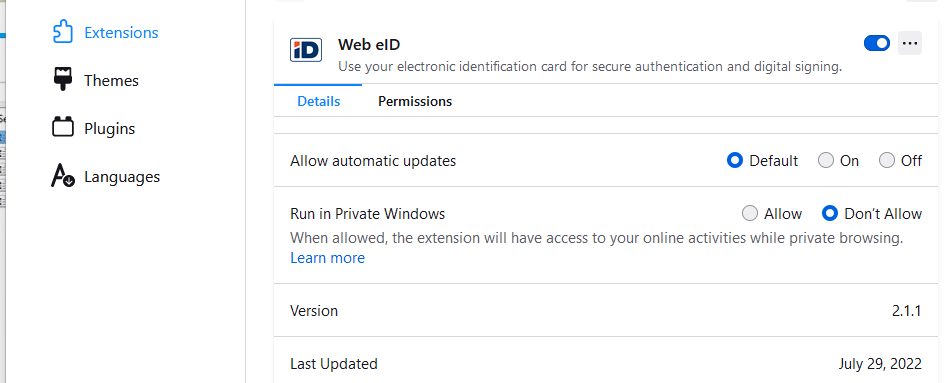
After applying either of these policies, the user can no longer disable the Firefox Web eID extension:

In addition, you can install the extension using the list Computer Configuration/Policies/Administrative Templates/Mozilla/Firefox/Extensions — Extensions to install, but for the current configuration, it is preferred to overwrite the existing value.
Microsoft Intune browser extension policies
Browser extension policies can also be pushed through Microsoft Intune device configuration profiles instead of Group Policy.
Google Chrome and Microsoft Edge
Chrome and Edge policies are backed by the same ADMX templates referenced above (Chromium Edge, Google Chrome):
- In the Intune admin center, go to Devices > Manage devices > Configuration > Create > New policy. Select Windows 10 and later as the platform and Settings catalog as the profile type. Chrome and Edge settings are built into the catalog, so their ADMX templates do not need to be imported.
- Configure the force-install extension setting (
Configure the list of force-installed apps and extensionsfor Chrome,Control which extensions are installed silentlyfor Edge) with the Web eID extension ID:ncibgoaomkmdpilpocfeponihegamlicfor Chrome,gnmckgbandlkacikdndelhfghdejfidofor Edge. - If native messaging is restricted with a blocklist policy, also add
eu.webeidto the corresponding allowlist setting, the same as described above for Chromium Edge and Google Chrome. - Assign the profile to the required device or user groups.
Mozilla Firefox
Firefox policies are not part of the built-in Intune settings catalog:
- Download the Firefox ADMX templates (see Mozilla Firefox above). In Devices > Manage devices > Configuration > Import ADMX, first import
mozilla.admxwith the matchingmozilla.adml. After their status is Available, importfirefox.admxwith the matchingfirefox.adml. -
Create a new profile with the platform Windows 10 and later and profile type Templates > Imported Administrative templates (Preview). Configure
Extension Managementwith the same JSON value described in the Mozilla Firefox section above.Warning: If your organization groups extension policies together, use
Extension Management (JSON on one line). Otherwise, Intune may insert extraneous characters into the policy. These characters are written as plain text to the Windows registry and cause a JSON syntax error. Intune and Firefox do not currently allow both variants to be used at the same time. Example of an invalid value written to the registry:�"*": {"installation_mode": "…. - Assign the profile to the required device or user groups.
Note: As with GPO, test the configurations described above in your specific environment(s) before deployment.
Updating the software
Central configuration is used for checking ID-software updates. The process compares the software version in use with the latest version available and, in the case of DigiDoc4, also with the latest supported software version. The central configuration can be found at https://id.eesti.ee/config.json. There are three different ways to start checking for software updates:
- Using the scheduled task
id updater task; - Starting the DigiDoc4 program;
- Running a manual search for software updates when launching the DigiDoc4 application.
Scheduled task id updater task
Note: This method only works with EXE installations — the registry values described below are not created with an MSI installation.
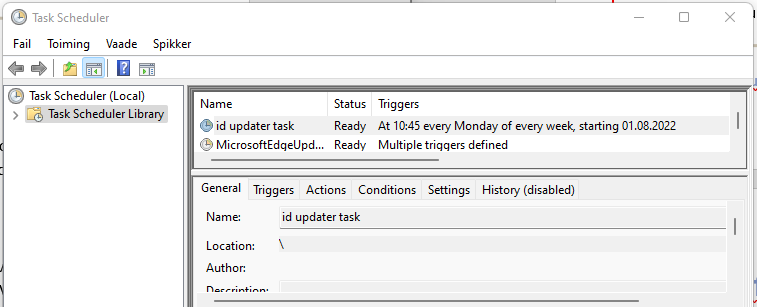
By default, during installation, the scheduled task id updater task is created, which checks the availability of a newer software version. If a newer version of the software is available, it will be offered to the user.
For ID-software version 26.4.20.8412, the version of the software can be found in the registry in the DisplayVersion field under the key HKEY_LOCAL_MACHINE\SOFTWARE\WOW6432Node\Microsoft\Windows\CurrentVersion\Uninstall\{5FBF3885-332F-4E02-B7C8-589775D00818}.
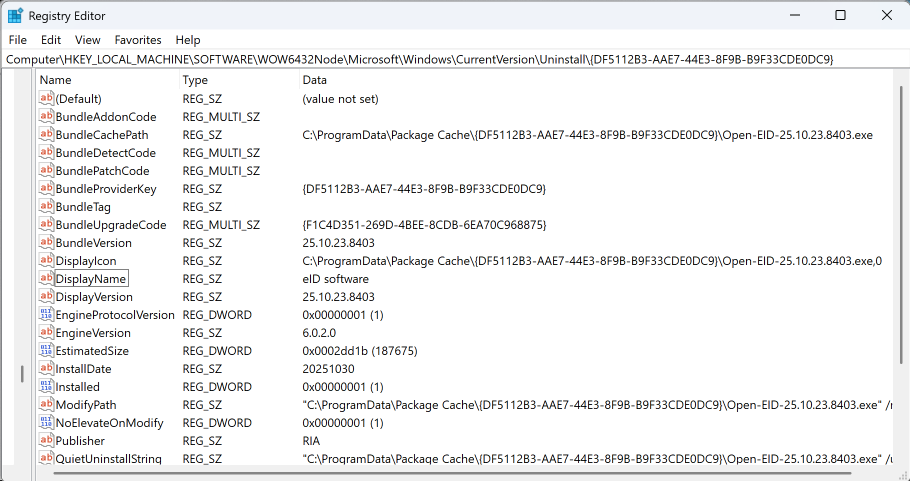
The generated unique key (here: {5FBF3885-332F-4E02-B7C8-589775D00818}) is different for each ID-software version. When the scheduled task id updater task is started, the central configuration is loaded into the computer’s memory, the WIN-LATEST parameter is read from there and compared with the DisplayVersion parameter in the registry. If the WIN-LATEST is greater than the value of the DisplayVersion field in the registry, the user is offered a software update.
Starting DigiDoc4
Also when starting the DigiDoc4 program, the software version is checked and compared with the version in the central configuration. The first time the DigiDoc4 program is started, the central configuration file config.json is downloaded to the folder %APPDATA%\RIA\qdigidoc4. At the first start, the LastCheck field is also written to the user’s registry, which, as expected, describes the time when the last request for a new version of the central configuration file was successful.
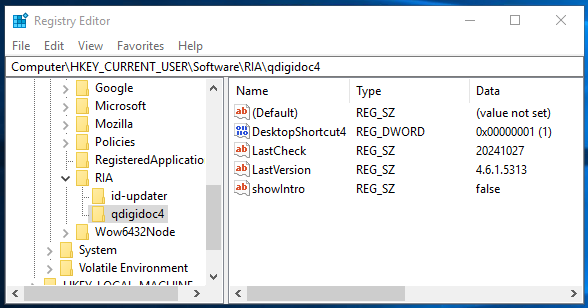
At each subsequent start of the DigiDoc4 application, the current date is compared with the LastCheck value mentioned above, and if this difference is greater than 4 days, the availability of new software is automatically checked. In the case of a successful check, the LastCheck field is also updated.
Outdated software
If the DigiDoc4 version in the LastVersion field in the user’s registry section is smaller than the one described in the QDIGIDOC4-SUPPORTED line in the central configuration file, the user will be informed of this every time the DigiDoc4 program is started: Your ID-software has expired. To download the latest software version, go to ….
Newer version of software
If the DigiDoc4 version in the LastVersion field of the user’s registry section is smaller than the one described in the QDIGIDOC4-LATEST line of the central configuration file, the user will be informed of this after starting the DigiDoc4 program: An ID-software update has been found. To download the update, go to …. The user is notified of the update the first time a version difference is found, and subsequent notifications are only sent when changes have been made to the central configuration file.2
Manual update search
To manually search for ID-software updates, open the settings in the DigiDoc4 program and then click the Refresh configuration text at the bottom. As a result, the process always checks for a new configuration file, downloads it if necessary, and then compares the version there with the software version on the computer. The computer version is read analogously to the scheduled task id updater task, from the DisplayVersion registry field under the key HKEY_LOCAL_MACHINE\SOFTWARE\WOW6432Node\Microsoft\Windows\CurrentVersion\Uninstall\{5FBF3885-332F-4E02-B7C8-589775D00818}.
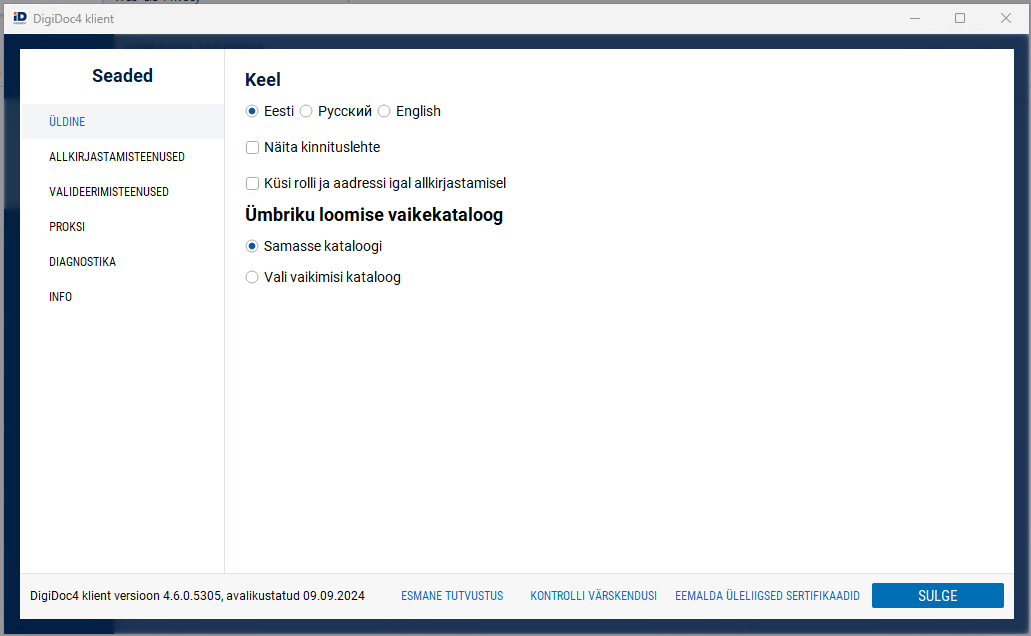
If a software update is available, it will be offered to the user. The user will also be notified if no ID-software updates are available:
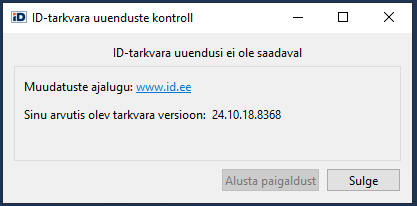
Note: This method also works correctly only for EXE installations.